| < Previous page | Next page > |
|
Applying Superelevation via spreadsheet entry
What follows is an alternative method of applying superelevation to the tabular method that has already been documented in a previous tutorial. In this method we simply fill in a spreadsheet table with the appropriate grades and widths of the pavement and the shoulders. Once these values have been entered we can either produce a written report or create variable template tables that may be used to produce the correct superelevation effect to which ever standard you are designing to.
In this tutorial we have been supplied with the job roadtut2. To obtain a copy of the job please Right Click on the following link and select the save target menu item roadtut2 The job contains a string containing two curves which we wish to be superelevated. A center-line in folder road with an id of cl has been supplied. Each of the curves has a 50m transition both in and out while each curve has a radius of 400 meters. The transitions and curves are completely user definable and are up to the individual designer and the appropriate local conditions. In this tutorial the completed job has been supplied. This way you can review the finished product while you read through the tutorial. The job data has been backed up as a cab file. Copy this file to your appropriate data directory and use the restore command under Options to extract the appropriate files. Winzip can also be used to extract the relevant files.
Using the Cogo route curve routine we have created the appropriate route curve which defines the horizontal alignment of the road centre-line. Using the String menu select this string. Now open the super elevation spreadsheet. This is found under the Road then Design menu and finally the Superelevation submenu and select the Spreadsheet option. Once we have entered here click on the "Extract chainage and code from selected string". The table will be filled in with the appropriate Transition start and end points as well as the start and end curve points. There is also a number of intermediate points which are need in the horizontal view but are unnecessary in this table. These points can be simply deleted by clicking on the far left number columns and hitting the delete key. Please note that you may select more than one entry by using the ctrl button while pressing with the left mouse. The shift key also works. After deleting these extra points we are left with the table seen below.
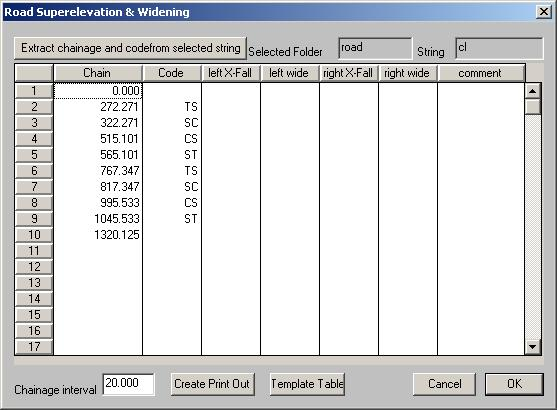
The codes and there meanings are
TS Transition Start
SC Start Curve
CS End of Curve
ST End of Transition
To apply the superelevation successfully we also need to calculate the chainage that the superelevation starts and finish's. What follows shows how these values may be calculated. Please be aware that the writer is not a road designer ; not even a Civil Engineer. The values and equations are taken from a 1965 Main Roads Department of Queensland Road Design manual. Your local DOT, council or Government board may have different standards and calculations that you may have to follow. It is up to you to check the values. If you put Garbage values into a computer program it will give Garbage values back out.
If you look at the first curve the appropriate values are
TS 272.271
SC 322.271
CS 515.101
ST 565.101
We have also decided that the maximum grade in this curve is to be 7%. This value is derived taking into account factors such as the road design speed; whether there could be slow moving vehicles and other factors that you as an engineer would be aware of. Also the normal grade in and out is 3%. From the diagram on the following page we are using the transitioned case as the horizontal alignment was designed with spirals in and out of each curve.
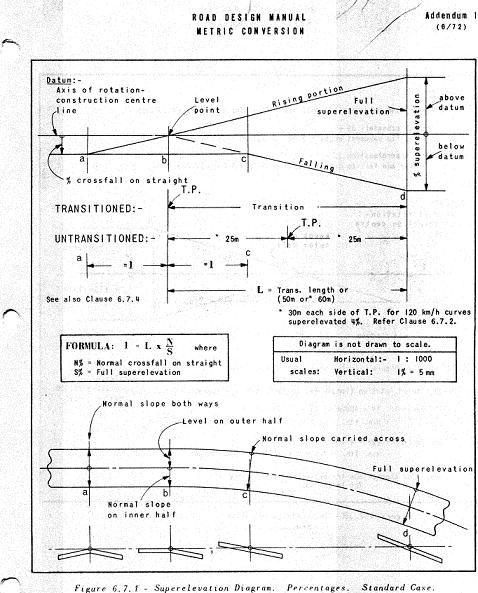
From the diagram we see the distance
l = L*N/S N% = Normal crossfall on straight 3%
S% = Full superelevation 7%
L = transition length 50m
ie l = 50*3.0/7.0 = 21.427
In this case both the curves had the same transition lengths and same radii of the curve so we can use these values to fill in the table. To enter a new line select the appropriate position by clicking on the line number to the left of the appropriate line. pressing the insert key will then insert a blank line. The modified table is seen below:
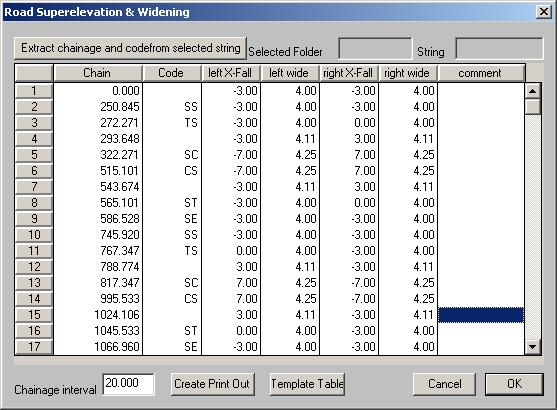
In this case we also wish to apply some widening to the road while in superelevation. You may or may not have to worry about this in your situation. The following quote follows from JABATAN KERJA RAYA (A Guide on Geometric Design of Roads). Widening should be attained gradually on the approaches to the curve to ensure a reasonable smooth alignment on the edge of pavement and to fit the path's of vehicles entering or leaving the curve. Preferably, widening should be attained over the superelevation runoff length with most of all of the widening attained at the start of circular curve point. For our interpretation we will ramp the widening up from the TS to maximum at the SC point. At the TS point the width will be 4.0 . At the SC point we wish the value to be 4.25 . As we have an intermediate point shown we need to fill in any intermediate calculated values. The completed table as shown above contains these calculated width values.
Once you are happy with the table it is time to create a print out. Pressing the "Create Print Out" button will create a display an RTF file showing the pavement width and superelevation along the road. This table is a good start for checking that superelevation is being applied correctly. We have also included the grades for inner and outer shoulders. At present these values are to Malaysian JKR standards. If you have your own standard that you would like implemented as well please email the appropriate standard to info@foresoft.com The RTF printout which includes the first curve only is shown below:
Chainage Code Left Side Right Side Comment
shld2 shld1 pave pave shld1 shld2
0.000 -4.00 -4.00 -3.00 -3.00 -4.00 -4.00
20.000 -4.00 -4.00 -3.00 -3.00 -4.00 -4.00
40.000 -4.00 -4.00 -3.00 -3.00 -4.00 -4.00
60.000 -4.00 -4.00 -3.00 -3.00 -4.00 -4.00
80.000 -4.00 -4.00 -3.00 -3.00 -4.00 -4.00
100.000 -4.00 -4.00 -3.00 -3.00 -4.00 -4.00
120.000 -4.00 -4.00 -3.00 -3.00 -4.00 -4.00
140.000 -4.00 -4.00 -3.00 -3.00 -4.00 -4.00
160.000 -4.00 -4.00 -3.00 -3.00 -4.00 -4.00
180.000 -4.00 -4.00 -3.00 -3.00 -4.00 -4.00
200.000 -4.00 -4.00 -3.00 -3.00 -4.00 -4.00
220.000 -4.00 -4.00 -3.00 -3.00 -4.00 -4.00
240.000 -4.00 -4.00 -3.00 -3.00 -4.00 -4.00
250.845 SS -4.00 -4.00 -3.00 -3.00 -4.00 -4.00
260.000 -4.00 -4.00 -3.00 -1.72 -4.00 -4.00
272.271 TS -4.00 -4.00 -3.00 0.00 -4.00 -4.00
280.000 -4.00 -4.00 -3.00 1.08 -4.00 -4.00
293.648 -4.00 -4.00 -3.00 3.00 -4.00 -4.00
300.000 -4.00 -4.00 -3.89 3.89 -3.11 -4.00
320.000 -6.68 -6.68 -6.68 6.68 -0.32 -4.00
322.271 SC -7.00 -7.00 -7.00 7.00 0.00 -4.00
340.000 -7.00 -7.00 -7.00 7.00 0.00 -4.00
360.000 -7.00 -7.00 -7.00 7.00 0.00 -4.00
380.000 -7.00 -7.00 -7.00 7.00 0.00 -4.00
400.000 -7.00 -7.00 -7.00 7.00 0.00 -4.00
420.000 -7.00 -7.00 -7.00 7.00 0.00 -4.00
440.000 -7.00 -7.00 -7.00 7.00 0.00 -4.00
460.000 -7.00 -7.00 -7.00 7.00 0.00 -4.00
480.000 -7.00 -7.00 -7.00 7.00 0.00 -4.00
500.000 -7.00 -7.00 -7.00 7.00 0.00 -4.00
515.101 CS -7.00 -7.00 -7.00 7.00 0.00 -4.00
520.000 -6.31 -6.31 -6.31 6.31 -0.69 -4.00
540.000 -4.00 -4.00 -3.51 3.51 -3.49 -4.00
543.674 -4.00 -4.00 -3.00 3.00 -4.00 -4.00
560.000 -4.00 -4.00 -3.00 0.71 -4.00 -4.00
565.101 ST -4.00 -4.00 -3.00 0.00 -4.00 -4.00
580.000 -4.00 -4.00 -3.00 -2.09 -4.00 -4.00
586.528 SE -4.00 -4.00 -3.00 -3.00 -4.00 -4.00
600.000 -4.00 -4.00 -3.00 -3.00 -4.00 -4.00
The spreadsheet dialog also has the option of creating variable templates. With these variable templates we can easily create cross sections for our road design. Pressing the template table button automatically fills in the values into variable tables 1 to 6 respectively. The contents of each table are
We are now in a position to create the standard tables for the left and right side of the road. Filling in table 1 as the left side of the road. The first entry is the "Start" instruction. The next entry refers to the road pavement. All the information is in variable template 1. Enter in a "Distance and Grade" command. Enter 0 and 0 for the distance and grade and enter in a table number (tab#) of 1 which means get the appropriate distance and grade out of variable table 1. The next line is for the inner shoulder and we again enter a "Distance and Grade" command and fill in a value of 3. Similarly for the next line were we have a variable template number of 4 for the outer most shoulder. From here we can enter the appropriate batter commands. The template for the right side of the road is number 2 and is filled in; in a similiar manner. Open the tables up in CDS if you require more detail and see how they have been filled out.
A vertical alignment has been supplied for you and you are in a position to scroll through your cross sections. You should note that superelevation has been applied appropriately through the horizontal curves. To change any of the superelevation variables consists of changing the appropriate values in the superelevation spreadsheet and re-clicking the "Template Table" button. The appropriate changes will show up in the cross-sections.
|